この記事ではサーバー構築の練習のため、1台のEC2インスタンスにnginx-SpringBoot-MySQL-redisを入れていきます。
尚、本来やるべきVPCの設定や、踏み台サーバーの構築は端折っています。
Contents
EC2インスタンスを作成
AWSマネージメントコンソールからEC2インスタンスを作成します。
ここではデフォルトVPCを使用しました。
インスタンスを起動ボタンを押します。

Amazon Linux 2 AMI のままで選択ボタンを押します。

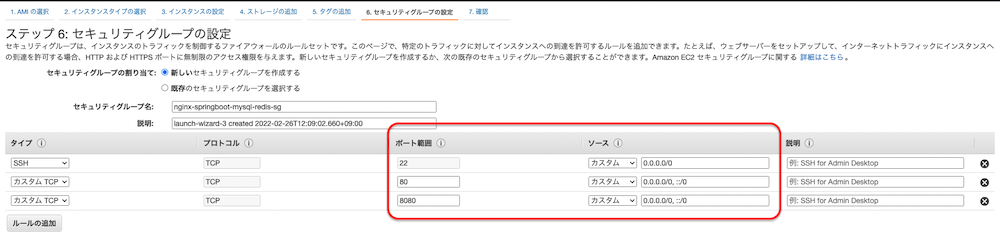
ステップ6.セキュリティグループの設定
ルールの追加ボタンを押して、80と8080の穴を開けておきます。
最終的には80のみ使用しますが、nginxを設定するまでは8080でアクセスするためです。
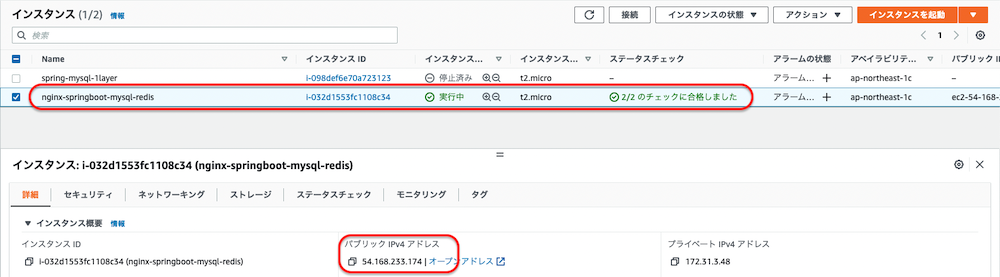
インスタンスが正常に起動されたことを確認します。
パブリックIpv4アドレスをメモしておきましょう。
ターミナル(windowsの場合はteratermなど)からEC2に接続します。
ssh -i pemファイル ec2-user@パブリックIpv4アドレス で接続できます。
ec2-userはEC2のデフォルトユーザーです。
noricgeographic@MacBook-Air ~ % ssh -i ~/.ssh/ec2-keypair.pem ec2-user@54.168.233.174
The authenticity of host '54.168.233.174 (54.168.233.174)' can't be established.
ED25519 key fingerprint is SHA256:NLEAULD+lNmqJY0N4KW7koBaMot898Oo88zGydoZB48.
This key is not known by any other names
Are you sure you want to continue connecting (yes/no/[fingerprint])? yes
Warning: Permanently added '54.168.233.174' (ED25519) to the list of known hosts.

       __|  __|_  )
       _|  (     /   Amazon Linux 2 AMI
      ___|\___|___|

https://aws.amazon.com/amazon-linux-2/
8 package(s) needed for security, out of 14 available
Run "sudo yum update" to apply all updates.

[ec2-user@ip-172-31-3-48 ~]$
EC2インスタンスにSSH接続できれば、構築の準備OKです。
Step1.SpringBootを単体で起動
事前注意
最初はredis関係の設定はコメントアウトしておいてください。SpringBootを起動するときに、redisがインストールされていないとエラーになるからです。
    # セッション管理設定
    #session:
        #store-type:redis
// // セッション管理の設定
// implementation "org.springframework.boot:spring-boot-starter-data-redis"
// implementation "org.springframework.session:spring-session-data-redis"ポイント
jdkをインストールします。
yumでもいいのですが、amazon-linux-extrasというAmazonのリポジトリからインストールする方が良いと思っています。
特定バージョンのJDKが欲しい場合は、yumで良いです。
手順1.JDKのインストール
次のコマンドを実行していきます。
// インストール対象を確認
[ec2-user@ip-172-31-3-48 ~]$ amazon-linux-extras | grep java
 33  java-openjdk11           available    [ =11  =stable ]

// JDKをインストール
[ec2-user@ip-172-31-3-48 ~]$ sudo amazon-linux-extras install -y java-openjdk11
Installing java-11-openjdk
...
 33  java-openjdk11=latest    enabled      [ =11  =stable ]
...

// インストール後の確認
[ec2-user@ip-172-31-3-48 ~]$ java -version
openjdk version "11.0.13" 2021-10-19 LTS
OpenJDK Runtime Environment 18.9 (build 11.0.13+8-LTS)
OpenJDK 64-Bit Server VM 18.9 (build 11.0.13+8-LTS, mixed mode, sharing)
あとはjava -jarでSpringBootの.jarを実行するだけなのですが、
ここではローカルで.jarを作成して、.jarをEC2に送信します。
手順2..jarをEC2に送信する
まずはローカルで.jarを作成してください。gradle build ないし gradle bootJarで作成できます。
作成した.jarをscpコマンドでEC2に送信します。scp -i [pemファイル] [ローカルの送信するファイル] ec2-user@[パブリックipv4アドレス]:[送信先ディレクトリ] の要領です。
okozukai-system % scp -i ~/.ssh/ec2-keypair.pem ./build/libs/okozukai-system-0.0.1-SNAPSHOT.jar ec2-user@54.168.233.174:~/
okozukai-system-0.0.1-SNAPSHOT.jar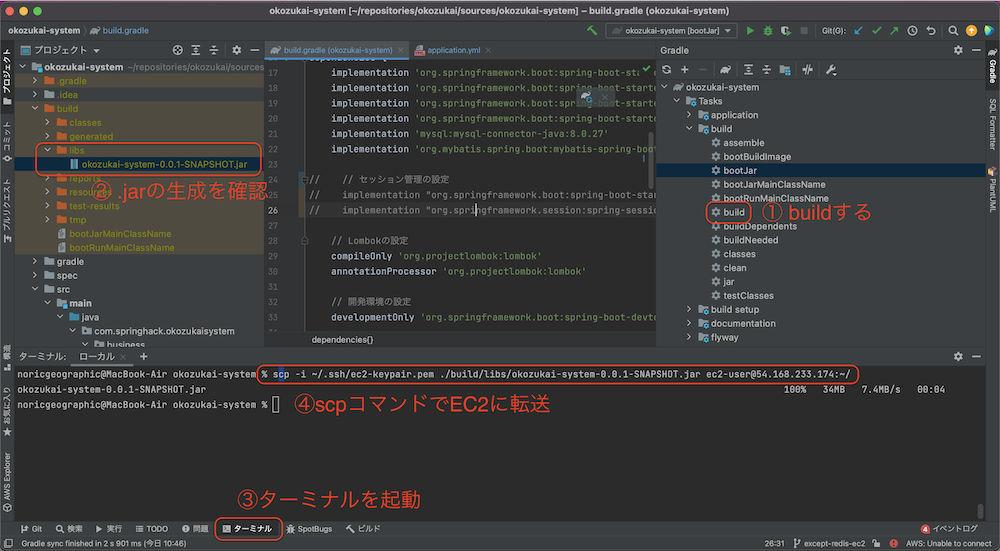
手順3.SpringBootを起動
再びEC2で作業します。
.jarを実行してSpringBootを起動します。
// .jarが転送されていることを確認
[ec2-user@ip-172-31-3-48 ~]$ ls
okozukai-system-0.0.1-SNAPSHOT.jar

// SpringBootを起動
[ec2-user@ip-172-31-3-48 ~]$ java -jar okozukai-system-0.0.1-SNAPSHOT.jar

  .   ____          _            __ _ _
 /\\ / ___'_ __ _ _(_)_ __  __ _ \ \ \ \
( ( )\___ | '_ | '_| | '_ \/ _` | \ \ \ \
 \\/  ___)| |_)| | | | | || (_| |  ) ) ) )
  '  |____| .__|_| |_|_| |_\__, | / / / /
 =========|_|==============|___/=/_/_/_/
 :: Spring Boot ::                (v2.6.3)

2022-02-26 03:51:00.302  INFO 10303 --- [           main] c.s.o.OkozukaiSystemApplication          : Starting OkozukaiSystemApplication using Java 11.0.13 on ip-172-31-3-48.ap-northeast-1.compute.internal with PID 10303 (/home/ec2-user/okozukai-system-0.0.1-SNAPSHOT.jar started by ec2-user in /home/ec2-user)
2022-02-26 03:51:00.307  INFO 10303 --- [           main] c.s.o.OkozukaiSystemApplication          : No active profile set, falling back to default profiles: default
2022-02-26 03:51:03.493  INFO 10303 --- [           main] o.s.b.w.embedded.tomcat.TomcatWebServer  : Tomcat initialized with port(s): 8080 (http)
2022-02-26 03:51:03.526  INFO 10303 --- [           main] o.apache.catalina.core.StandardService   : Starting service [Tomcat]
2022-02-26 03:51:03.527  INFO 10303 --- [           main] org.apache.catalina.core.StandardEngine  : Starting Servlet engine: [Apache Tomcat/9.0.56]
2022-02-26 03:51:03.673  INFO 10303 --- [           main] o.a.c.c.C.[Tomcat].[localhost].[/]       : Initializing Spring embedded WebApplicationContext
2022-02-26 03:51:03.674  INFO 10303 --- [           main] w.s.c.ServletWebServerApplicationContext : Root WebApplicationContext: initialization completed in 3165 ms
2022-02-26 03:51:05.952  INFO 10303 --- [           main] o.s.b.a.w.s.WelcomePageHandlerMapping    : Adding welcome page template: index
2022-02-26 03:51:06.362  INFO 10303 --- [           main] o.s.b.w.embedded.tomcat.TomcatWebServer  : Tomcat started on port(s): 8080 (http) with context path ''
2022-02-26 03:51:06.387  INFO 10303 --- [           main] c.s.o.OkozukaiSystemApplication          : Started OkozukaiSystemApplication in 8.027 seconds (JVM running for 9.13)
正常に起動できていれば、ブラウザから http://EC2のパブリックIPv4アドレス:8080にアクセスして動作確認しましょう。
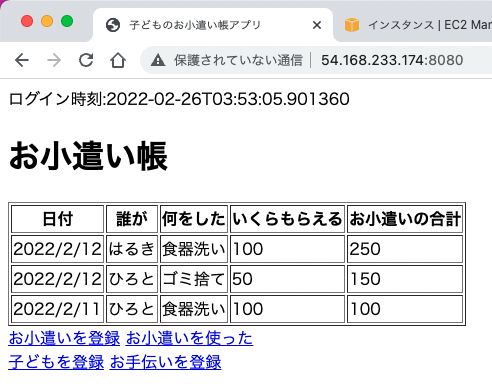
とりあえず画面表示できていればOKです。
DBはまだインストールしていないので、DB接続箇所はまだ動きません。
ここまでで、8080ポートでSpringBootを単体で起動できました。
Step2.SpringBoot+MySQL
MySQLのインストールとセットアップは実はなかなか厄介です。
手順4.MySQLリポジトリを設定
MySQLのリポジトリはamazon-linux-extrasやyumのリポジトリに登録されていないため、手動で登録します。
[ec2-user@ip-172-31-3-48 ~]$ sudo yum update -y
読み込んだプラグイン:extras_suggestions, langpacks, priorities, update-motd
...
完了しました!

[ec2-user@ip-172-31-3-48 ~]$ sudo yum install -y https://dev.mysql.com/get/mysql80-community-release-el7-3.noarch.rpm
読み込んだプラグイン:extras_suggestions, langpacks, priorities, update-motd
mysql80-community-release-el7-3.noarch.rpm                                                                                                               |  25 kB  00:00:00
...
完了しました!
手順5.MySQLをインストール・起動
MySQLのインストール自体は、sudo yum install -y mysql-community-server
これで行けるのですが、mysql-community-client-8.0.28-1.el7.x86_64.rpm の公開鍵がインストールされていませんと怒られるため、先に公開鍵を入手してから、インストールしましょう。
// 公開鍵を入手
[ec2-user@ip-172-31-3-48 ~]$ sudo rpm --import https://repo.mysql.com/RPM-GPG-KEY-mysql-2022

// MySQLをインストール
[ec2-user@ip-172-31-3-48 ~]$ sudo yum install -y mysql-community-server
読み込んだプラグイン:extras_suggestions, langpacks, priorities, update-motd
...
完了しました!
無事MySQLをインストールできたら、サービスとして起動します。
// MySQLを起動する
[ec2-user@ip-172-31-3-48 ~]$ sudo systemctl enable --now mysqld

// 起動を確認する
[ec2-user@ip-172-31-3-48 ~]$ systemctl status mysqld
● mysqld.service - MySQL Server
   Loaded: loaded (/usr/lib/systemd/system/mysqld.service; enabled; vendor preset: disabled)
   Active: active (running) since 土 2022-02-26 04:22:12 UTC; 4s ago
     Docs: man:mysqld(8)
           http://dev.mysql.com/doc/refman/en/using-systemd.html
  Process: 26934 ExecStartPre=/usr/bin/mysqld_pre_systemd (code=exited, status=0/SUCCESS)
 Main PID: 27005 (mysqld)
   Status: "Server is operational"
   CGroup: /system.slice/mysqld.service
           └─27005 /usr/sbin/mysqld

 2月 26 04:22:06 ip-172-31-3-48.ap-northeast-1.compute.internal systemd[1]: Starting MySQL Server...
 2月 26 04:22:12 ip-172-31-3-48.ap-northeast-1.compute.internal systemd[1]: Started MySQL Server.
緑色のランプが付いて「Active: active (running)」と表示されていればOKです。
手順6.MySQLユーザーを作成
ここからは、
・rootユーザーのパスワードを確認する
・rootユーザーのパスワードを変更する
・rootユーザーでMySQLに接続する
・rootユーザーでアプリ用のデータベース(スキーマ)とユーザーを作成する
という手順になります。
rootユーザーのパスワードを変更しないと、データベースを作成しようとしたときに、次のように怒られるからです。
mysql> CREATE DATABASE okozukai CHARACTER SET =utf8mb4;
ERROR 1820 (HY000): You must reset your password using ALTER USER statement before executing this statement.
では、手順を開始しましょう。
まず、rootユーザーのパスワードを確認します。
パスワードは、次のように検索します。
[ec2-user@ip-172-31-3-48 ~]$ sudo grep 'temporary password' /var/log/mysqld.log
2022-02-26T04:22:08.695928Z 6 [Note] [MY-010454] [Server] A temporary password is generated for root@localhost: 7-xhogxMp/j9
7-xhogxMp/j9 の部分がパスワードなので、
それを用いてrootユーザーでMySQLに接続します。
次に、mysql_secure_installationコマンドを用いて、パスワードを変更します。
パスワードは大文字小文字数字記号を含む必要があります。
対話形式でセキュリティ設定をしていきます。
[ec2-user@ip-172-31-3-48 ~]$ sudo mysql_secure_installation -p'7-xhogxMp/j9'
mysql_secure_installation: [Warning] Using a password on the command line interface can be insecure.

Securing the MySQL server deployment.


The existing password for the user account root has expired. Please set a new password.

New password: // ここで新しいパスワードを入力する

Re-enter new password: // もう一度新しいパスワードを入力する
The 'validate_password' component is installed on the server.
The subsequent steps will run with the existing configuration
of the component.
Using existing password for root.

Estimated strength of the password: 100
Change the password for root ? ((Press y|Y for Yes, any other key for No) : y

New password:

Re-enter new password:

Estimated strength of the password: 100
Do you wish to continue with the password provided?(Press y|Y for Yes, any other key for No) : y
By default, a MySQL installation has an anonymous user,
allowing anyone to log into MySQL without having to have
a user account created for them. This is intended only for
testing, and to make the installation go a bit smoother.
You should remove them before moving into a production
environment.

Remove anonymous users? (Press y|Y for Yes, any other key for No) : y
Success.


Normally, root should only be allowed to connect from
'localhost'. This ensures that someone cannot guess at
the root password from the network.

Disallow root login remotely? (Press y|Y for Yes, any other key for No) : no

 ... skipping.
By default, MySQL comes with a database named 'test' that
anyone can access. This is also intended only for testing,
and should be removed before moving into a production
environment.


Remove test database and access to it? (Press y|Y for Yes, any other key for No) : y
 - Dropping test database...
Success.

 - Removing privileges on test database...
Success.

Reloading the privilege tables will ensure that all changes
made so far will take effect immediately.

Reload privilege tables now? (Press y|Y for Yes, any other key for No) : y
Success.

All done!
パスワードが変更できたら、新しいパスワードでMySQLにrootユーザーで接続します。
[ec2-user@ip-172-31-3-48 ~]$ mysql -uroot -p
Enter password:
Welcome to the MySQL monitor.  Commands end with ; or \g.
Your MySQL connection id is 8
Server version: 8.0.28

Copyright (c) 2000, 2022, Oracle and/or its affiliates.

Oracle is a registered trademark of Oracle Corporation and/or its
affiliates. Other names may be trademarks of their respective
owners.

Type 'help;' or '\h' for help. Type '\c' to clear the current input statement.

mysql>
接続できたら、アプリ用のデータベース(スキーマ)とユーザーを作成しましょう。ここからはMySQLの世界です。
// MySQLに接続
[ec2-user@ip-172-31-3-48 ~]$ mysql -uroot -p
Enter password:
Welcome to the MySQL monitor.  Commands end with ; or \g.
Your MySQL connection id is 11
Server version: 8.0.28 MySQL Community Server - GPL

Copyright (c) 2000, 2022, Oracle and/or its affiliates.

Oracle is a registered trademark of Oracle Corporation and/or its
affiliates. Other names may be trademarks of their respective
owners.

Type 'help;' or '\h' for help. Type '\c' to clear the current input statement.

// データベースを作成
mysql> CREATE DATABASE okozukai CHARACTER SET =utf8mb4;
Query OK, 1 row affected (0.01 sec)

// アプリ用のユーザーを接続
mysql> CREATE USER 'okozukaiadmin'@'localhost' IDENTIFIED BY 'lknuve7gAre%';
Query OK, 0 rows affected (0.02 sec)

// アプリ用のユーザーに権限を付与
mysql> GRANT ALL PRIVILEGES ON * . * TO 'okozukaiadmin'@'localhost';
Query OK, 0 rows affected (0.01 sec)

mysql> exit
Bye
手順7.作成したユーザーでDDLを実行
次に、アプリ用に作成したユーザーの接続テストも兼ねて、DDLを実行します。
ここでは、事前に用意したDDLを手動で実行していきます。
[ec2-user@ip-172-31-3-48 ~]$ mysql -uokozukaiadmin -p
Enter password:
Welcome to the MySQL monitor.  Commands end with ; or \g.
Your MySQL connection id is 12
Server version: 8.0.28 MySQL Community Server - GPL

Copyright (c) 2000, 2022, Oracle and/or its affiliates.

Oracle is a registered trademark of Oracle Corporation and/or its
affiliates. Other names may be trademarks of their respective
owners.

Type 'help;' or '\h' for help. Type '\c' to clear the current input statement.

mysql> use okozukai;
Database changed

mysql> CREATE TABLE `children` (
    ->   `child_id` bigint unsigned NOT NULL AUTO_INCREMENT,
    ->   `name` varchar(50) NOT NULL,
    ->   `birthday` date NOT NULL,
    ->   PRIMARY KEY (`child_id`)
    -> ) ENGINE=InnoDB;
Query OK, 0 rows affected (0.04 sec)

mysql> CREATE TABLE `helps` (
    ->   `help_id` int unsigned NOT NULL AUTO_INCREMENT,
    ->   `name` varchar(50) NOT NULL DEFAULT '',
    ->   `unit_price` int NOT NULL,
    ->   PRIMARY KEY (`help_id`)
    -> ) ENGINE=InnoDB;
Query OK, 0 rows affected (0.02 sec)

mysql> ALTER TABLE `children` ADD `version` int unsigned NOT NULL DEFAULT 0;
Query OK, 0 rows affected (0.04 sec)
Records: 0  Duplicates: 0  Warnings: 0

mysql> show tables;
+--------------------+
| Tables_in_okozukai |
+--------------------+
| children           |
| helps              |
+--------------------+
2 rows in set (0.00 sec)
手順8.SpringBootを起動・動作確認
Step1同様にjava -jar によりアプリを起動します。
その後、ブラウザからアクセスして、動作確認します。
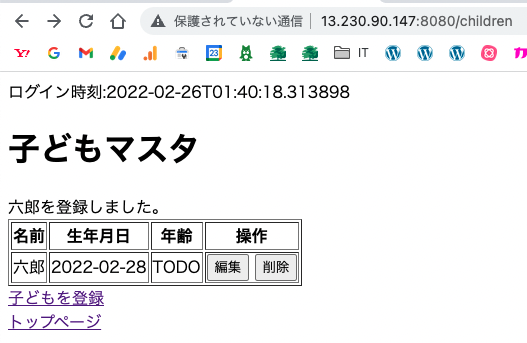
DB登録機能など、DBに接続する箇所が正常に動いていればOKです。
ここまでで、SpringBootからMySQLに接続でき、8080ポートでSpringBootにアクセスできました。
Step3.SpringBoot+MySQL+redis
事前注意
Step1で無効にしておいたredisを有効にした後で.jarファイルを作成しておきましょう。
作り直した.jarはStep1に記載の要領でEC2に送信しておきます。
    // セッション管理の設定
    implementation "org.springframework.boot:spring-boot-starter-data-redis"
    implementation "org.springframework.session:spring-session-data-redis"
spring:
# セッション管理設定
session:
store-type:redis手順9.redisをインストール・起動
amazon-linux-extrasリポジトリにあるredisを使用します。
// redisがamazon-linux-extrasリポジトリにあることを確認
[ec2-user@ip-172-31-12-19 ~]$ sudo amazon-linux-extras list | grep redis
 56  redis6                   available    [ =stable ]

// redisをインストール
[ec2-user@ip-172-31-12-19 ~]$ sudo amazon-linux-extras install redis6
Installing redis
...
 56  redis6=latest            enabled      [ =stable ]
 ...

// redisを起動
[ec2-user@ip-172-31-12-19 ~]$ redis-server -v
Redis server v=6.2.6 sha=00000000:0 malloc=jemalloc-5.1.0 bits=64 build=f9737c05e8ea2913

// redisをsystemctlに追加
[ec2-user@ip-172-31-12-19 ~]$ sudo systemctl start redis

// reidsの起動を確認
[ec2-user@ip-172-31-12-19 ~]$ sudo systemctl status redis
● redis.service - Redis persistent key-value database
   Loaded: loaded (/usr/lib/systemd/system/redis.service; disabled; vendor preset: disabled)
  Drop-In: /etc/systemd/system/redis.service.d
           └─limit.conf
   Active: active (running) since 土 2022-02-26 01:53:00 UTC; 7s ago
 Main PID: 10634 (redis-server)
   Status: "Ready to accept connections"
   CGroup: /system.slice/redis.service
           └─10634 /usr/bin/redis-server 127.0.0.1:6379

 2月 26 01:53:00 ip-172-31-12-19.ap-northeast-1.compute.internal systemd[1]: Starting Redis persistent key-value database...
2月 26 01:53:00 ip-172-31-12-19.ap-northeast-1.compute.internal systemd[1]: Started Redis persistent key-value database.SpringBootプロジェクトでredisへの接続設定を書いてないですが、デフォルトの接続先(localhost:6379)へ接続しに行ってくれます。
手順10.動作確認
java -jar によりSpringBootを起動し、エラーが出なければ、ブラウザからアクセスしてみましょう。
[ec2-user@ip-172-31-12-19 ~]$ java -jar okozukai-system-0.0.1-SNAPSHOT.jar

  .   ____          _            __ _ _
 /\\ / ___'_ __ _ _(_)_ __  __ _ \ \ \ \
( ( )\___ | '_ | '_| | '_ \/ _` | \ \ \ \
 \\/  ___)| |_)| | | | | || (_| |  ) ) ) )
  '  |____| .__|_| |_|_| |_\__, | / / / /
 =========|_|==============|___/=/_/_/_/
 :: Spring Boot ::                (v2.6.3)

2022-02-26 02:02:59.075  INFO 11410 --- [           main] c.s.o.OkozukaiSystemApplication          : Starting OkozukaiSystemApplication using Java 11.0.14.1 on ip-172-31-12-19.ap-northeast-1.compute.internal with PID 11410 (/home/ec2-user/okozukai-system-0.0.1-SNAPSHOT.jar started by ec2-user in /home/ec2-user)
2022-02-26 02:02:59.083  INFO 11410 --- [           main] c.s.o.OkozukaiSystemApplication          : No active profile set, falling back to default profiles: default
2022-02-26 02:03:01.151  INFO 11410 --- [           main] .s.d.r.c.RepositoryConfigurationDelegate : Multiple Spring Data modules found, entering strict repository configuration mode!
2022-02-26 02:03:01.159  INFO 11410 --- [           main] .s.d.r.c.RepositoryConfigurationDelegate : Bootstrapping Spring Data Redis repositories in DEFAULT mode.
2022-02-26 02:03:01.219  INFO 11410 --- [           main] .s.d.r.c.RepositoryConfigurationDelegate : Finished Spring Data repository scanning in 21 ms. Found 0 Redis repository interfaces.
2022-02-26 02:03:03.313  INFO 11410 --- [           main] o.s.b.w.embedded.tomcat.TomcatWebServer  : Tomcat initialized with port(s): 8080 (http)
2022-02-26 02:03:03.344  INFO 11410 --- [           main] o.apache.catalina.core.StandardService   : Starting service [Tomcat]
2022-02-26 02:03:03.345  INFO 11410 --- [           main] org.apache.catalina.core.StandardEngine  : Starting Servlet engine: [Apache Tomcat/9.0.56]
2022-02-26 02:03:03.490  INFO 11410 --- [           main] o.a.c.c.C.[Tomcat].[localhost].[/]       : Initializing Spring embedded WebApplicationContext
2022-02-26 02:03:03.491  INFO 11410 --- [           main] w.s.c.ServletWebServerApplicationContext : Root WebApplicationContext: initialization completed in 4267 ms
2022-02-26 02:03:06.743  INFO 11410 --- [           main] o.s.b.a.w.s.WelcomePageHandlerMapping    : Adding welcome page template: index
2022-02-26 02:03:08.410  INFO 11410 --- [           main] o.s.b.w.embedded.tomcat.TomcatWebServer  : Tomcat started on port(s): 8080 (http) with context path ''
2022-02-26 02:03:09.039  INFO 11410 --- [           main] s.a.ScheduledAnnotationBeanPostProcessor : No TaskScheduler/ScheduledExecutorService bean found for scheduled processing
2022-02-26 02:03:09.067  INFO 11410 --- [           main] c.s.o.OkozukaiSystemApplication          : Started OkozukaiSystemApplication in 11.975 seconds (JVM running for 13.346)
セッションを使用する部分が機能していれば、セッションストレージがredisになっています。
ここまでで、SpringBootからMySQLとredisに接続でき、8080ポートでSpringBootにアクセスできました。
Step4.SpringBoot+MySQL+redis+nginx
手順11.nginxのインストール・設定
最後に、nginxを入れていきます。
amazon-linux-extrasにnginxがあるのでそれを利用します。
[ec2-user@ip-172-31-12-19 ~]$ sudo amazon-linux-extras install -y nginx1
Installing nginx
...
 38  nginx1=latest            enabled      [ =stable ]
...
nginxの設定です。
80ポートをSprintBootの8080ポートに転送する設定を記述します。
[ec2-user@ip-172-31-12-19 ~]$ sudo vi /etc/nginx/conf.d/default.conf
server {
    listen 80;

    location / {
        proxy_pass http://localhost:8080;
    }
}
/etc/nginx/nginx.confが最初に読み込まれ、そこから/etc/nginx/conf.d/xxx.confがインクルードされます。
上記の/etc/nginx/conf.d/default.confもインクルード対象です。
それでは、nginxを起動しましょう。
// nginxを自動起動するよう設定しておく
[ec2-user@ip-172-31-12-19 ~]$ systemctl enable nginx

// nginxを起動する
[ec2-user@ip-172-31-12-19 ~]$ sudo systemctl start nginx

// nginxの起動を確認する
[ec2-user@ip-172-31-12-19 ~]$ sudo systemctl status nginx
● nginx.service - The nginx HTTP and reverse proxy server
   Loaded: loaded (/usr/lib/systemd/system/nginx.service; disabled; vendor preset: disabled)
   Active: active (running) since 土 2022-02-26 02:26:40 UTC; 4s ago
  Process: 22003 ExecStart=/usr/sbin/nginx (code=exited, status=0/SUCCESS)
  Process: 21998 ExecStartPre=/usr/sbin/nginx -t (code=exited, status=0/SUCCESS)
  Process: 21997 ExecStartPre=/usr/bin/rm -f /run/nginx.pid (code=exited, status=0/SUCCESS)
 Main PID: 22005 (nginx)
   CGroup: /system.slice/nginx.service
           ├─22005 nginx: master process /usr/sbin/nginx
           └─22006 nginx: worker process

 2月 26 02:26:39 ip-172-31-12-19.ap-northeast-1.compute.internal systemd[1]: Starting The nginx HTTP and reverse proxy server...
 2月 26 02:26:40 ip-172-31-12-19.ap-northeast-1.compute.internal nginx[21998]: nginx: the configuration file /etc/nginx/nginx.conf syntax is ok
 2月 26 02:26:40 ip-172-31-12-19.ap-northeast-1.compute.internal nginx[21998]: nginx: configuration file /etc/nginx/nginx.conf test is successful
 2月 26 02:26:40 ip-172-31-12-19.ap-northeast-1.compute.internal systemd[1]: Started The nginx HTTP and reverse proxy server.
手順12.EC2のセキュリティグループを確認
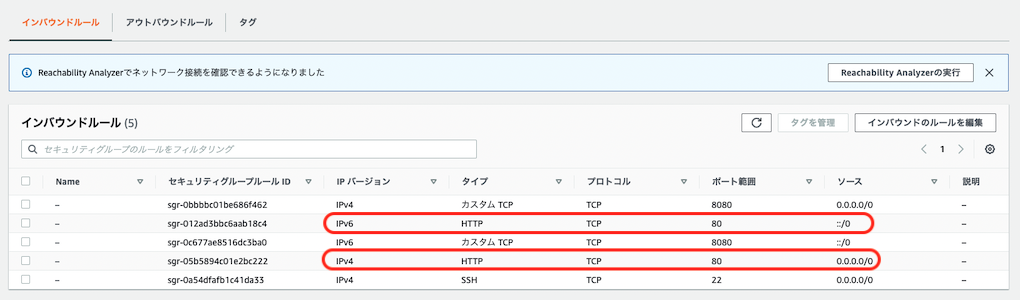
EC2>セキュリティグループ>インバウンドルール
で、80ポートが空いていることを確認してください。
nginxの待ち受けポートである80でアクセスするためです。
この時点で、8080ポートは不要になるので気になる人は削除してください。
手順13.動作確認(完成)
java -jar によりSpringBootを起動し、エラーが出なければ、ブラウザから80ポートにアクセスしてみましょう。
[ec2-user@ip-172-31-12-19 ~]$ java -jar okozukai-system-0.0.1-SNAPSHOT.jar

  .   ____          _            __ _ _
 /\\ / ___'_ __ _ _(_)_ __  __ _ \ \ \ \
( ( )\___ | '_ | '_| | '_ \/ _` | \ \ \ \
 \\/  ___)| |_)| | | | | || (_| |  ) ) ) )
  '  |____| .__|_| |_|_| |_\__, | / / / /
 =========|_|==============|___/=/_/_/_/
 :: Spring Boot ::                (v2.6.3)

2022-02-26 02:02:59.075  INFO 11410 --- [           main] c.s.o.OkozukaiSystemApplication          : Starting OkozukaiSystemApplication using Java 11.0.14.1 on ip-172-31-12-19.ap-northeast-1.compute.internal with PID 11410 (/home/ec2-user/okozukai-system-0.0.1-SNAPSHOT.jar started by ec2-user in /home/ec2-user)
2022-02-26 02:02:59.083  INFO 11410 --- [           main] c.s.o.OkozukaiSystemApplication          : No active profile set, falling back to default profiles: default
2022-02-26 02:03:01.151  INFO 11410 --- [           main] .s.d.r.c.RepositoryConfigurationDelegate : Multiple Spring Data modules found, entering strict repository configuration mode!
2022-02-26 02:03:01.159  INFO 11410 --- [           main] .s.d.r.c.RepositoryConfigurationDelegate : Bootstrapping Spring Data Redis repositories in DEFAULT mode.
2022-02-26 02:03:01.219  INFO 11410 --- [           main] .s.d.r.c.RepositoryConfigurationDelegate : Finished Spring Data repository scanning in 21 ms. Found 0 Redis repository interfaces.
2022-02-26 02:03:03.313  INFO 11410 --- [           main] o.s.b.w.embedded.tomcat.TomcatWebServer  : Tomcat initialized with port(s): 8080 (http)
2022-02-26 02:03:03.344  INFO 11410 --- [           main] o.apache.catalina.core.StandardService   : Starting service [Tomcat]
2022-02-26 02:03:03.345  INFO 11410 --- [           main] org.apache.catalina.core.StandardEngine  : Starting Servlet engine: [Apache Tomcat/9.0.56]
2022-02-26 02:03:03.490  INFO 11410 --- [           main] o.a.c.c.C.[Tomcat].[localhost].[/]       : Initializing Spring embedded WebApplicationContext
2022-02-26 02:03:03.491  INFO 11410 --- [           main] w.s.c.ServletWebServerApplicationContext : Root WebApplicationContext: initialization completed in 4267 ms
2022-02-26 02:03:06.743  INFO 11410 --- [           main] o.s.b.a.w.s.WelcomePageHandlerMapping    : Adding welcome page template: index
2022-02-26 02:03:08.410  INFO 11410 --- [           main] o.s.b.w.embedded.tomcat.TomcatWebServer  : Tomcat started on port(s): 8080 (http) with context path ''
2022-02-26 02:03:09.039  INFO 11410 --- [           main] s.a.ScheduledAnnotationBeanPostProcessor : No TaskScheduler/ScheduledExecutorService bean found for scheduled processing
2022-02-26 02:03:09.067  INFO 11410 --- [           main] c.s.o.OkozukaiSystemApplication          : Started OkozukaiSystemApplication in 11.975 seconds (JVM running for 13.346)
:8080 を外してアクセスしましょう。
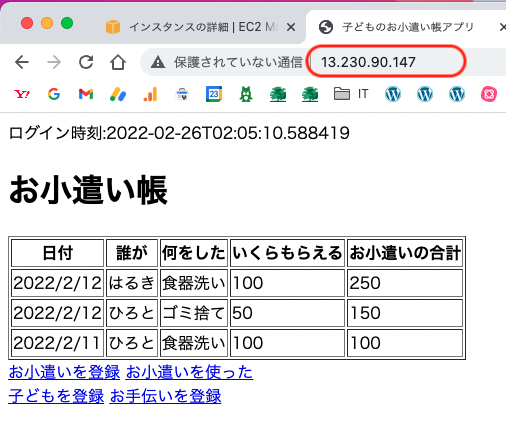
期待する機能が使えていればOKです。
ここまでで、SpringBootからMySQLとredisに接続でき、80ポートのnginxを経由してSpringBootにアクセスできました。(完)
最後に
本番環境では各プロセスの実行ユーザーの設定や、MySQL,redis,nginxなどにセキュリティ対策や細かい設定を加えていくと思いいますが、この手順を土台にしていただければ幸いです。
また、EC2とのSSH接続を切断した後もSpringBootを起動しておくようにするには、systemdの設定が必要です。
詳しくはSpringBootをサービス化(デーモン化)して常駐させるを参照してください。
以上